
Converting a JPG image to a vector file is essential for high-quality printing, embroidery, and scalable design work. This guide from Mahi Digitizing will walk you through each stage of vector conversion—even if you’re just starting out.
1. Understanding the Basics of JPG and Vector Files
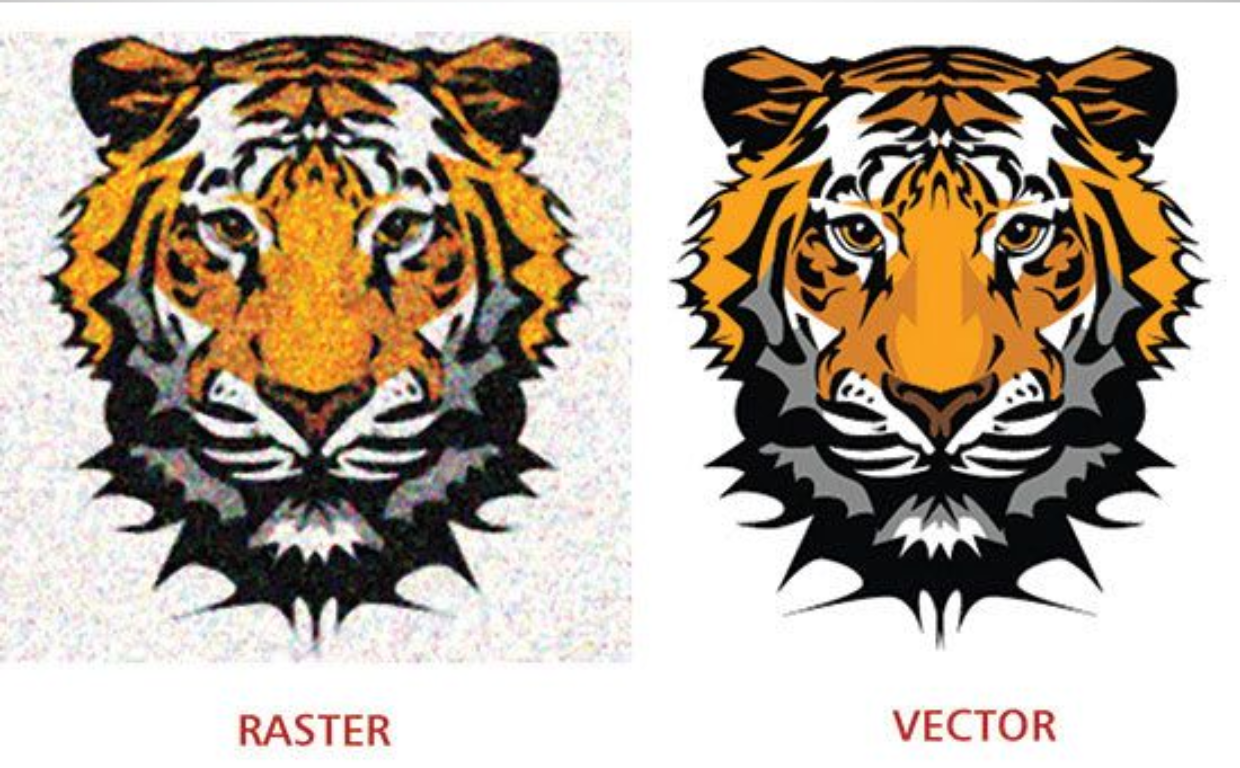
A JPG is a raster image made of pixels. It’s suitable for web use but becomes blurry when scaled. Vectors, on the other hand, are mathematical paths that stay sharp at any size.
Common vector file formats include SVG, AI, and EPS. These files are ideal for logos, patches, and large-scale printing because of their scalability and clarity.
Raster images lose detail upon enlargement, whereas vectors maintain design integrity no matter the resolution or application.
Knowing this difference helps you decide which format is best for your specific use case, especially in embroidery and branding.
If your image contains fine lines or needs to be enlarged on fabric or vinyl, converting to a vector is the smart choice.
You can get help understanding your file needs by consulting Mahi Digitizing’s vectorization experts.
2. Choosing the Right Software
To convert JPG to vector, you need vector editing software like Adobe Illustrator, CorelDRAW, or Inkscape. Each offers tools to trace and refine artwork.
Illustrator’s “Image Trace” tool is popular for beginners and allows for both automatic and manual refinement of traced paths.
Inkscape is a free alternative with a similar tracing tool, ideal for those learning vector design on a budget.
CorelDRAW provides user-friendly tracing and shape tools that suit embroidery-specific needs.
Choose the software that matches your experience level and project goals. Simpler logos may need basic tracing, while detailed art requires fine control.
Need help deciding? Get in touch with Mahi Digitizing for professional vector file creation.
3. Importing and Preparing Your JPG
Open your chosen software and import the JPG file. Adjust brightness and contrast to improve line visibility before tracing.
Clean up any background noise or fuzziness in the image by adjusting thresholds. This ensures sharper edge detection during tracing.
Crop out unnecessary elements so the trace focuses only on the key artwork you want converted.
Some software lets you enhance or simplify the color palette, which is useful for reducing complexity in the final vector.
Make sure the image is high enough resolution (at least 300 DPI) for best tracing accuracy. Blurry images may result in rough paths.
For best results, ask the customer to provide the cleanest version of the image possible, or let our team enhance it for you.
4. Tracing the Image to Create Vector Paths
Use the “Image Trace” tool or “Path Trace” in your software to convert the raster outlines into vector paths. Start with a preset like black and black or color.
After tracing, expand the results so that your paths become editable vector shapes. This step finalizes the conversion from raster to vector.
Zoom in to inspect edges and curves. Use pen and anchor tools to fix jagged lines or unnecessary nodes.
Simplify overly complex shapes by removing redundant points and straightening lines without altering design accuracy.
For text, trace outlines separately or match fonts manually. Avoid auto-tracing text unless you plan to clean it thoroughly afterward.
This manual cleanup ensures your vector file is usable for embroidery digitizing or screen printing at any size.
5. Refining and Saving the Vector File
Once traced, refine your vector by adjusting anchor points and curves for smooth transitions and precision alignment.
Group related elements, align layers, and remove unnecessary segments to clean up your final design.
Save the file in multiple formats—AI for editing, SVG for web, and EPS or PDF for print and embroidery.
Be sure to outline fonts if you used any, so they render properly even if the recipient doesn’t have the same font installed.
Always keep a backup of both the vector and original JPG in case revisions are needed later on.
For complex artwork, trust Mahi Digitizing to vectorize and prepare files to industry standards.
6. Final Tips for Beginners
Start with simple logos or black-and-black artwork before moving on to colored or detailed designs. Practice improves your tracing and path-editing skills.
Don’t rely solely on auto-trace tools. Manual correction often makes the difference between amateur and professional results.
Always review your final design on different backgrounds to ensure it’s clean and works for both print and digital use.
Learn from online tutorials and communities like Vectornator or Adobe’s own user forums.
Check your file compatibility with clients before delivery. Some platforms prefer SVG, while others demand EPS or PDF.
When in doubt, request a quote from Mahi Digitizing and let our pros handle it with precision and speed.